
Three years ago my dear friend Riikka and I decided it would be fun to see a film (each in our own hometown) and then create something inspired by the things we saw in that film. We would keep our projects secret from each other until ‘reveal day’ when we would post them on our blogs.
We both enjoyed it immensely, so we kept coming up with new themes to inspire us. Month, after month, after month… And now we’ve arrived at our 37th Inspired by!
We’ve covered 8 films, 2 books, 2 cities, 1 ballet, 1 TV miniseries, 4 paintings/artists, 1 fashion designer, 1 fashion campaign, 4 pieces of music, 2 magazines, 6 items/materials, 1 photo safari, 1 album cover, 1 colour scheme and of course we scraplifted each other at one time.
If I’ve counted correctly, I created 19 scrapbook pages, 1 mini book, 3 sewing projects, 11 art journal pages, 10 mixed media canvases/panels, 1 bracelet and 5 up-cycled items.
I would not have created these things if it weren’t for Riikka and our monthly challenge. I’m forever grateful to her. Thank you so much Riikka!
Inspired by allows us to play and create as we please, not limited by rules, formats or materials. It enables us to grow and discover new things.
I cannot begin to tell you how much I’ve learned whilst just preparing for Inspired by. I would not miss it for the world!
Well, enough of all that talk! Let’s get to this month’s theme!
This time we decided to be inspired by: 3. Yes, 3.
The first thing that popped into my head was: 3, I can do that! I’m one of three kids!
Or… I can do 3 materials, 3 colours, a triptych… What was the 3rd Inspired by again?
Songs with 3!
Am I revealing my age now?! Hahaha! Wait for this one:
I found that first Sesame Street clip whilst I was looking for the pinball machine. It’s from (one of) the first Sesame Street episodes that aired in the US. Did you see Jim Henson juggling? And the crayon doodles around the numbers? How cool is that!
I remember watching the Pinball Number Count as a kid. It wasn’t a favourite, because it’s looooong and booooring and in my memory I had seen it over, and over, and over again.
Apparently my appreciation of contemporary art and pop music was still in it’s developing stages… I didn’t even realize is that the song is sung by the Pointer Sisters. Wow, Sesame Street was right on trend back then!
Of course I had never heard it sung by the Pointer Sisters before, because it was dubbed Dutch in the Netherlands. The Dutch version doesn’t sound half as hip!
Anyway: I skipped the photos of me and my siblings and all the other stuff I had thought of and I concentrated on the Pinball Number Count. There are so many elements in there to be inspired by! I decided to recreate the last scene in the clip.
In the end I did not set myself any limits on colour or the amount of materials, but as Jack Johnson’s song was the first song I came up with, I thought it would be fun to reduce some of the clutter in my room and I reused/recycled a couple of things that were on my table from earlier projects!
Here’s what I came up with:
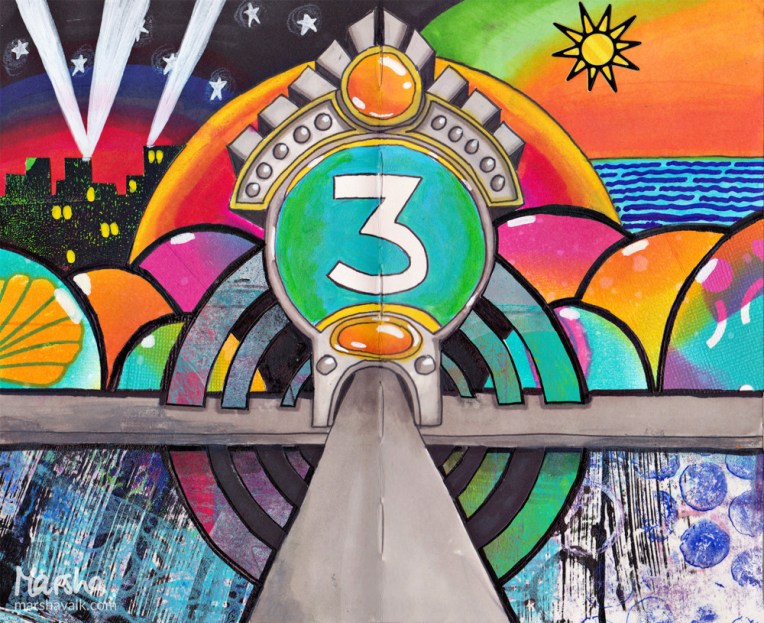
Materials: monoprinted deli paper and cardstock, cardstock scraps inked with Ranger Adirondack and Distress Inks, Letraset Promarkers, Liquitex Soft Body Acrylics and Matte Medium, Caran d’Ache Neocolor II, several black and white pens/markers, washi tape and a Elizabeth Craft Designs Peel-off Sticker.
Happy 3rd birthday Inspired by!!!
And now I’m going to head on over to Riikka at Paperiliitin, because I can’t wait to see her project!

